
Scheduling an email in Outlook lets you write a message now and send it later. You can finish a proposal after hours and have it arrive during work time. You can prepare a team update on Sunday and send it on Monday morning.
This feature is useful when you work with people in other time zones. You can write the email when it suits you and choose a delivery time that suits the reader. It also helps you avoid sending messages late at night or on a weekend.
Outlook does not work the same way on every device. The steps are different in the new Outlook app, the classic Outlook app, the web version, the Mac app, and the mobile app. This guide covers all of them in plain steps.
You will learn how to schedule a single email, how to check that it is really scheduled, and how to edit or cancel it before it goes out. You will also learn the common problems that stop scheduled emails from sending.
Why Schedule an Email
People schedule emails for many good reasons. A message sent at three in the morning can look unprofessional, even if the content is fine. Scheduling it for nine in the morning gives a much better impression.
Timing also affects whether your email gets read. A message that arrives during work hours is more likely to be opened quickly. A message that arrives in the middle of the night can be buried under newer mail by morning.
Scheduling helps with planning too. You can write several emails in one focused session and spread their delivery across the week. This keeps your communication steady without keeping you tied to your inbox all day.
It is also useful for reminders and follow-ups. You can write a reminder while the details are fresh in your mind, then schedule it for the day before a deadline. The email will arrive right when it is needed.
Step 1: Identify Which Version of Outlook You Use
Before you look for any button, check which Outlook you are using. There is no single Outlook app, and the steps differ between versions. Knowing your version saves you from following the wrong instructions.
New Outlook for Windows is the modern app with a clean, simple design. It has a Settings cog in the top right corner. Outlook on the web runs in a browser at Outlook.com or through your work webmail, and it works almost exactly like new Outlook.
Classic Outlook for Windows is the long-standing desktop app that comes with Microsoft Office and Microsoft 365. It has a File tab at the top left and a ribbon full of tools across the top. Outlook for Mac is the version on Apple computers, and Outlook mobile is the app on iPhone and Android phones.
Check the sender account as well as the app. If you have several accounts in Outlook, the From address matters. A feature that works for your work mailbox may not be available for a personal account in the same app.
Step 2: Write Your Email First
Scheduling does not change how you write an email. It only changes when the finished message leaves your outbox. Start by composing the message exactly as you normally would.
Open Outlook and click New mail to start a fresh message. Type the recipient address in the To field, add anyone else in Cc if needed, and write a clear subject line. Then write the body of your message.
Check your message carefully before you schedule it. Read the subject line, check the recipient addresses, and look at any attachments. A scheduled email is easy to forget, so mistakes can sit unnoticed until the message is already sent.
Pay attention to time-sensitive words in your text. If you write "tomorrow" on a Friday and the email goes out on Monday, the reader will be confused. Use a clear date instead, like "the meeting on Monday 18 November", whenever the exact day matters.
Add your attachments before you schedule the message. Make sure each file is the final version and that the recipient can open it. A correctly timed email is still unhelpful if the attachment is wrong.
Step 3: Open the Arrow Beside Send and Choose Schedule Send
In new Outlook for Windows, Outlook on the web, and Outlook.com, the scheduling control sits right next to the Send button. This is the simplest version of the feature, and it is the one most people will use.
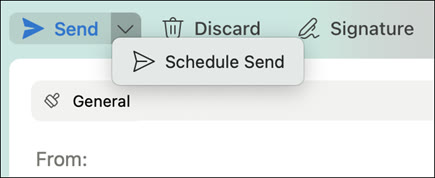
Look at the top of your compose window. You will see the Send button with a small downward arrow attached to its right side. Click that small arrow to open a dropdown menu.
Choose Schedule send from the menu that appears. On some Outlook.com screens, the same option is called Send later. Both names lead to the same scheduling window, so use whichever label your version shows.
If you do not see the arrow beside Send, check that you are using new Outlook or the web version. The classic desktop app uses a different method, which is covered in Step 6 of this guide. The option is also missing for some account types, which we explain in the troubleshooting section.
Step 4: Pick a Suggested Time or a Custom Time
After you choose Schedule send, a small window will open with time choices. Outlook will suggest a few common times, such as tomorrow morning or Monday morning. You can pick one of these with a single click.
If none of the suggested times fit, choose Custom time. This opens a calendar and a time field where you can set your own date and time. Pick the date first, then set the hour and minute.
Double-check the date and time before you confirm. It is easy to pick the wrong day when you are in a hurry, especially near the end of a month. Make sure the time is in the future, not in the past.
Think about the recipient's time zone as well. Outlook schedules the email in your own time zone by default. If your reader is in another country, work out the time difference before you pick a delivery time.
Step 5: Confirm the Schedule and Check Your Drafts
After you pick a time, click Send to confirm the schedule. The email will not go out right away. It will wait in your Drafts folder until the time you chose arrives.
Do not just assume the schedule worked. Open your Drafts folder and find the message. Look for a notice on the message that shows the scheduled date and time. A message sitting in Drafts without that notice may be an ordinary unsaved draft.
Microsoft's servers send the message for you in new Outlook and on the web. That means you can close Outlook or shut down your computer and the email will still go out on time. This is one of the biggest advantages of the new version.
If you need to change the message later, you can open it in Drafts before the send time. Edit the text, then schedule it again, or send it right away if your plans have changed.
Step 6: Schedule an Email in Classic Outlook for Windows
Classic Outlook for Windows uses a different method called Delay Delivery. The steps are a little longer, but they work well once you know where to look. These steps apply to Exchange mailboxes, such as a Microsoft 365 work account.
Compose your email as usual and add your recipients, subject, and message. Then click the Options tab in the ribbon at the top of the compose window. Look for the Delay Delivery button in the ribbon.
Clicking Delay Delivery opens the Properties window for the message. Under Delivery options, you will see a checkbox labeled Do not deliver before. Tick that checkbox and set the date and time you want.
Click Close to return to your email, then click Send. The message will move to your Outbox folder, where it waits until the time you picked. Check the Outbox to confirm it is there.

There is one important warning for classic Outlook. The message is held on your own computer, not on a server. Outlook must be open and connected to the internet at the scheduled time, or the email will not go out.
If your laptop is asleep or switched off at the send time, the email will wait until Outlook is running again. For an important message, keep your computer awake and connected, or use Outlook on the web instead.
Step 7: Schedule an Email in Outlook for Mac
Outlook for Mac has its own version of the scheduling feature. The steps are close to the new Outlook method, but the labels are slightly different. You will find the control on the Send button.
Write your email and add at least one recipient in the To field. Then click the small arrow beside the Send button. Choose Schedule send from the menu. Older versions of Outlook for Mac call this option Send Later.
Enter the date and time you want, then click OK to confirm. The message will wait in your Drafts folder until the time arrives. Open Drafts to check that the scheduled time is shown on the message.
Microsoft says the Mac version can send the scheduled message even when Outlook is closed. That is different from classic Outlook on Windows, where the app must stay open. The Mac feature needs a supported Exchange account and does not work with IMAP or POP accounts.
To change a scheduled message on a Mac, open it in Drafts and choose Cancel Send. You can then edit the message, send it right away, or schedule it again for a new time. Confirm the new time after you save it.
Step 8: Schedule an Email on iPhone or Android
The Outlook mobile app also lets you schedule emails. This is handy when you are away from your computer and want a message to arrive during work hours. The feature is available for supported accounts in the app.
Start a new message or open a draft in the Outlook app. Write your email as usual, then tap the three-dot menu in the compose screen. The menu holds extra options that do not fit on the main screen.
Choose Schedule send from that menu. Pick one of the suggested times or set your own date and time, then confirm the schedule. The message will appear in your Drafts folder marked as scheduled.
If the Schedule send option is missing, check for an app update in your app store. Also confirm which account is selected, because the feature may not be available for every account type. You can try the same mailbox in Outlook on the web as an alternative.
Do not confuse scheduling a new email with snoozing a received one. Snoozing hides an incoming message until later, but it does not schedule a new outgoing email. The two features look similar but do very different jobs.
Step 9: Edit, Cancel, or Send a Scheduled Email Now
Plans change, and Outlook lets you change a scheduled email before it goes out. The exact steps depend on which version you used to schedule it. Always use the same app where you created the schedule if you can.
In new Outlook and on the web, open the scheduled message in your Drafts folder. Select Cancel send to stop the schedule. You can then edit the message and schedule it again, leave it as a draft, or click Send to send it right away.
In classic Outlook for Windows, open the message in your Outbox folder. Change the delivery time in the Properties window, then click Close and Send again. To send it immediately, clear the Do not deliver before checkbox and send it. To cancel it, delete the message from the Outbox before it is due.
After you reschedule a message, reopen it and check the new time. This catches the easy mistake of editing the email but leaving it as an ordinary unscheduled draft. A quick check takes seconds and prevents a missed deadline.
Step 10: Test Scheduling Before an Important Email
For a proposal, a customer update, or any message with a hard deadline, run a short test first. A test uses harmless content and checks your real account and device setup without risking the real email.
Send the test to an inbox you can check yourself, such as a second email address you own. Give it a clear subject, like "Scheduling test, expected at 2.10 pm". Choose a time about ten minutes ahead and confirm the schedule.
Reproduce the conditions you plan for the real send. If you want to close your browser or switch off your laptop, do that during the test. Then check on another device whether the message arrived at the right time.
Compare the intended time with the time on the received message. If it arrived late or not at all, fix the problem and test again with a different subject. One successful test is useful evidence, but it is not a guarantee against a future outage.
Schedule for the Recipient's Time Zone
Outlook schedules emails in your own time zone by default. That is fine when the reader is in the same city, but it can cause problems across time zones. A message meant for nine in the morning can arrive at three in the morning for the reader.
Work out the time difference before you choose a delivery time. If your reader is five hours behind you, a two o'clock delivery in your time means nine in the morning for them. Many people use a world clock website or their phone's clock app to check this.
Write the delivery time down before you set it. This avoids confusion when you are switching between time zones in your head. Some people also add the time zone in the email itself, such as "the call is at 3 pm Pakistan time".
If you send to people in several time zones at once, pick a time that is reasonable for most of them. Late morning in your time zone is often a safe middle ground. Avoid very early or very late hours unless the message is urgent.
Delay Every Email by a Few Minutes
Outlook also offers a safety net for all your emails, not just scheduled ones. You can set a rule that delays every message by a few minutes after you click Send. This gives you a short window to catch a mistake.
In classic Outlook for Windows, go to File, then Manage Rules and Alerts, then New Rule. Start from a blank rule, apply it to messages you send, and tick the option to defer delivery by a number of minutes. Choose a delay that suits you, such as two or five minutes.
This is different from Schedule send, which holds one message until a set time. A delay rule holds every message briefly, then sends it. It is a good habit if you often spot typos right after clicking Send.
Note that the new Outlook app does not offer this rule in the same way. The delay rule is a classic Outlook feature. If you use new Outlook, you can use the Undo Send option instead, which gives you a few seconds to recall a message.
Tips for Scheduling Emails Well
Keep a short checklist for every scheduled email. Check the sender address, the recipient list, the subject line, the attachments, and the delivery time. Five quick checks catch most mistakes before they matter.
Leave a delivery buffer for important messages. Schedule the email an hour or two before the real deadline if you can. This protects you if a server delay or a connection problem slows the send.
Read your email as if it is already the delivery day. A message that made sense on Friday may confuse the reader on Monday. Fix any words like "today" or "tomorrow" that depend on when you wrote the message.
If you send the same kind of email often, save it as a template. A template keeps your wording consistent and saves time. Our guide to Outlook email templates shows how to set one up in a few steps.
Related: how to create an email template in Outlook
Troubleshooting and Frequently Asked Questions
Why is the Schedule send option missing?
First, check your Outlook version and follow the right steps for it. Then check your account type. Schedule send does not work with IMAP or POP accounts, such as a Gmail or Yahoo account added to Outlook. It needs an Exchange or Microsoft 365 account in most versions.
Why did my scheduled email not send?
In classic Outlook, the app must be open and connected at the send time. If the computer was off or asleep, the message waits in the Outbox until Outlook runs again. In new Outlook and on the web, the message is sent by the server, so check that the schedule was saved correctly in Drafts.
Can I schedule the same email to repeat every week?
Outlook does not offer a built-in way to send the same email on a repeating schedule. You would need to create each message separately or use an add-in or a separate tool. For a weekly update, many people keep a draft template and schedule a fresh copy each week.
Can I schedule an email in Outlook on my phone?
Yes, the Outlook mobile app has a Schedule send option in the three-dot menu of the compose screen. It works for supported accounts. If the option is missing, update the app and check that your account supports the feature.
Is Schedule send the same as Undo Send?
No, they are different features. Schedule send holds a message until a future time you choose. Undo Send gives you a few seconds after clicking Send to stop a message that just went out. Undo Send is for quick mistakes, while Schedule send is for planned timing.
What is the best time to schedule a business email?
Late morning on a weekday is a safe choice for most business emails. Messages sent early in the morning can be buried under overnight mail. Messages sent late in the day may not be read until the next morning. Tuesday, Wednesday, and Thursday mornings usually work well.
Can I change the time after I schedule an email?
Yes, as long as the send time has not passed. Open the message in Drafts or the Outbox, cancel the schedule, and set a new time. Always reopen the message afterwards to confirm the new time was saved.
Does scheduling work when my computer is off?
It depends on your version. In new Outlook and on the web, Microsoft's servers send the message, so your computer can be off. In classic Outlook with cached mode, Outlook must be running and connected at the send time.
Why does my scheduled email appear in Sent Items before it is delivered?
Some Outlook features, such as Viva Insights suggestions, manage scheduled messages differently. A message in Sent Items does not always mean the recipient has received it yet. Check the message details to see its real delivery status.
Can I set a priority on a scheduled email?
Yes, you can mark an email as high or low importance before you schedule it. The priority setting stays with the message. Our guide to email priority in Outlook explains where to find that setting.
Related: how to set the priority of an email in Outlook
Closing
Scheduling an email in Outlook is a small skill that saves a lot of awkward moments. You can write when you have time and let Outlook deliver the message when it counts. The steps take less than a minute once you know where the buttons are.
Remember the key points from this guide. Find your Outlook version first, write the email carefully, and always check Drafts or the Outbox to confirm the schedule. For classic Outlook, keep the app open and connected until the send time.
With these habits, your emails will arrive at the right time, every time. You will look more professional, and your readers will get your messages when they are ready to act on them. If you often send to groups, learning the BCC field will also help you keep recipient addresses private.
Related: how to add the BCC field in Outlook